
Overview
This guide provides support agents with step-by-step instructions on how to effectively manage tickets within the RAKAN Team Portal. By following this guide, agents can ensure efficient ticket processing, timely team member responses, and optimal workflow management.
1. Accessing the Ticket Management Page
- Log in to the RAKAN Team Portal with your support agent credentials.
- Navigate to the Tickets section in the top navigation menu.
- You will see the ticket management dashboard with existing tickets listed by status.
- The main navigation shows: Dashboard, Tickets, Reports, Team Member sections.
2. How to View and Manage Ticket Entries
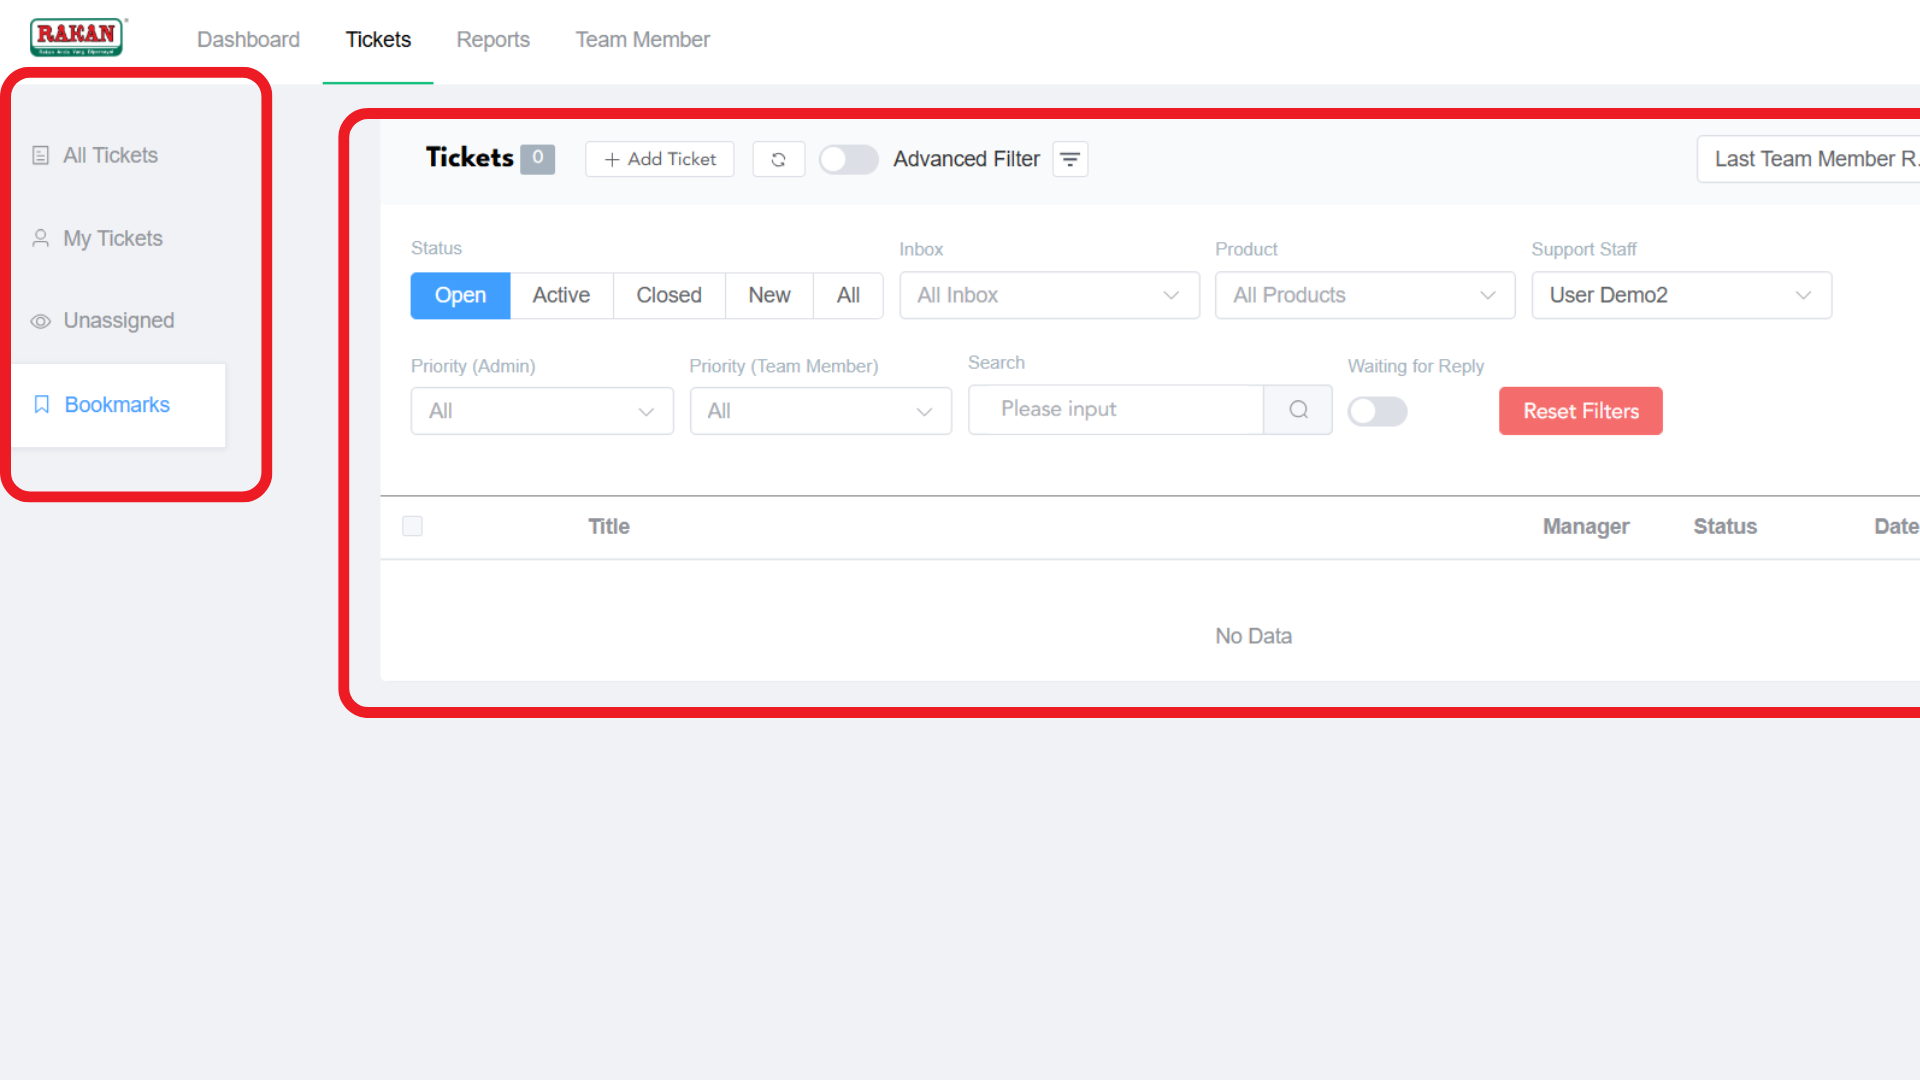
2.1 Understanding Ticket Sections
After accessing “Tickets” you will find four main sections in the left sidebar to view and manage your tickets:
- All Tickets: You will find every ticket here that you can easily view.
- My Tickets: You will only see the tickets that are assigned to you as a specific agent.
- Unassigned: You will find tickets that are not assigned to any agents.
- Bookmarks: All the bookmarked tickets will be stored in this section.
2.2 Dashboard Overview
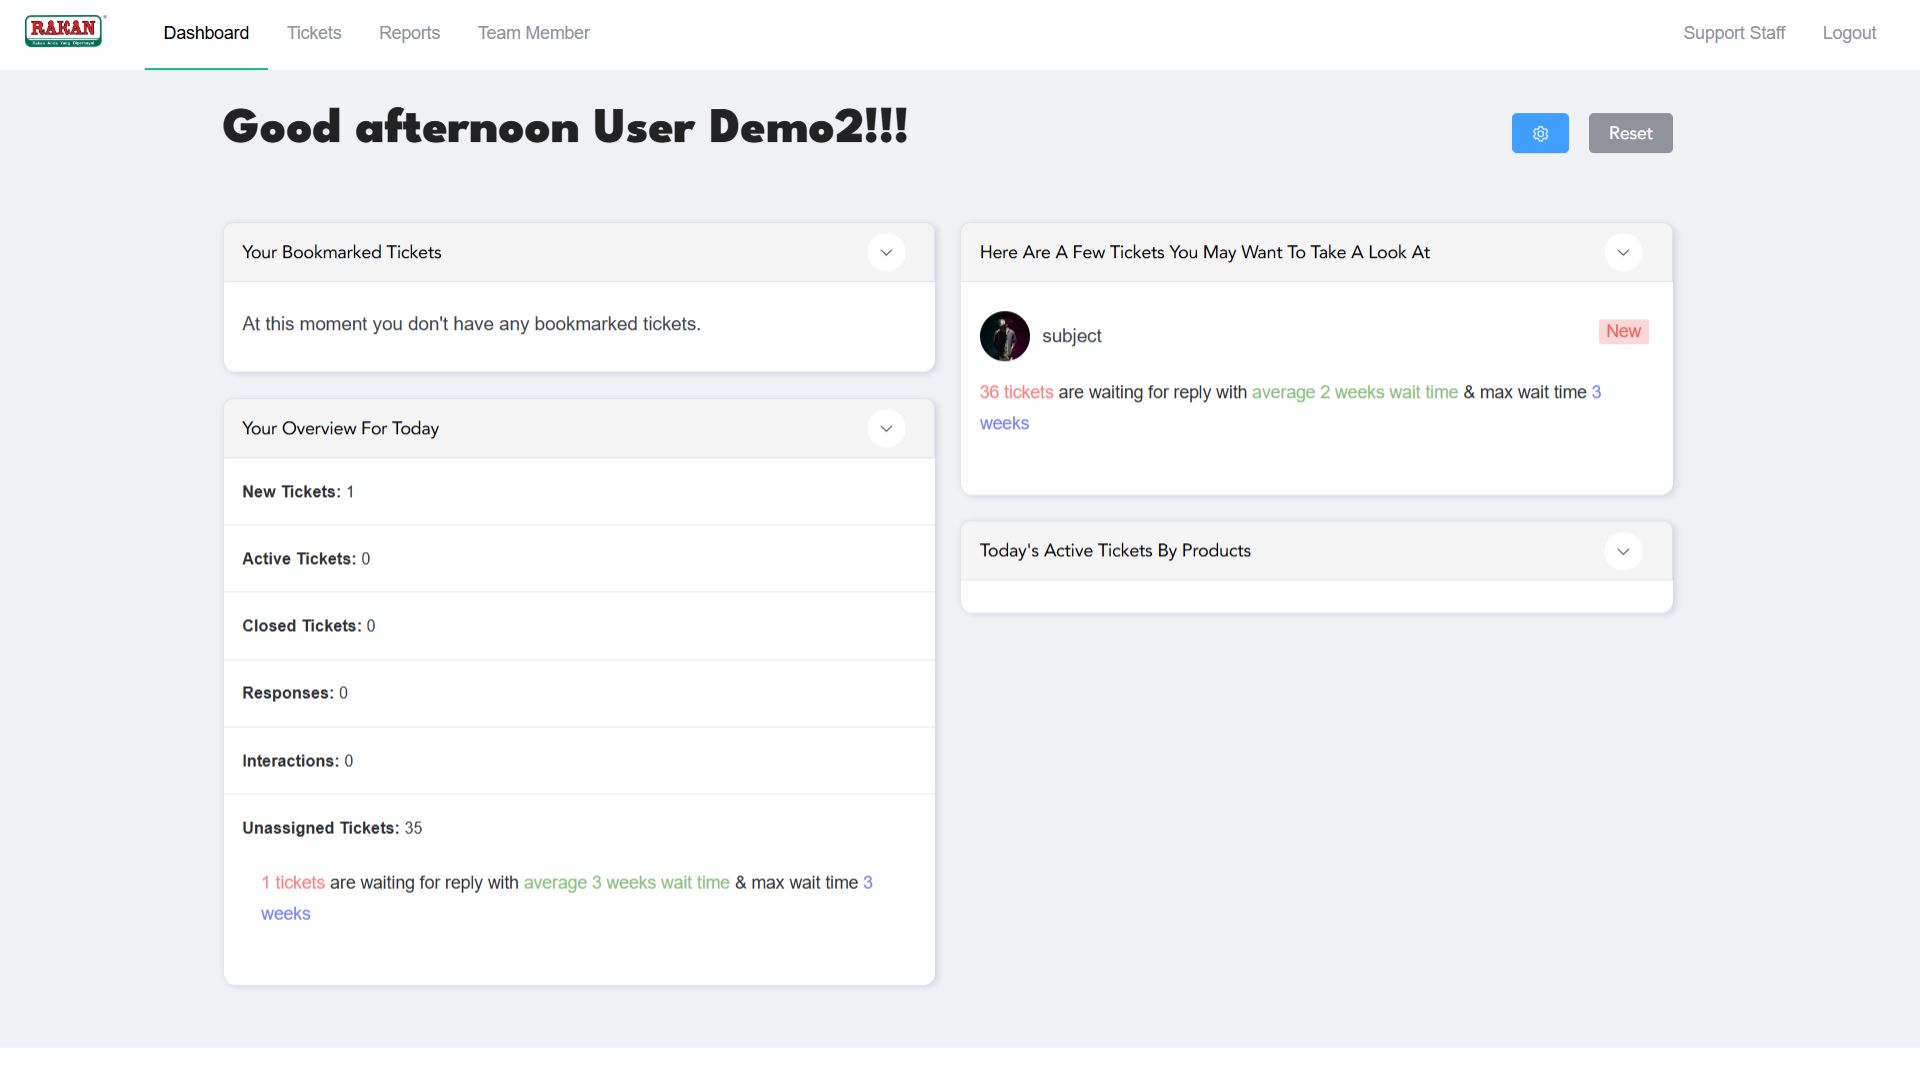
The main dashboard displays several key sections:
- Your Bookmarked Tickets: Shows tickets you have bookmarked for quick access.
- Here Are A Few Tickets You May Want To Take A Look At: Displays priority tickets requiring attention.
- Your Overview For Today: Shows daily statistics including New Tickets, Active Tickets, Closed Tickets, Responses, and Interactions.
- Today’s Active Tickets By Products: Overview of tickets categorized by products.
- Unassigned Tickets: Shows the count of tickets awaiting assignment.
2.3 Tickets List Interface
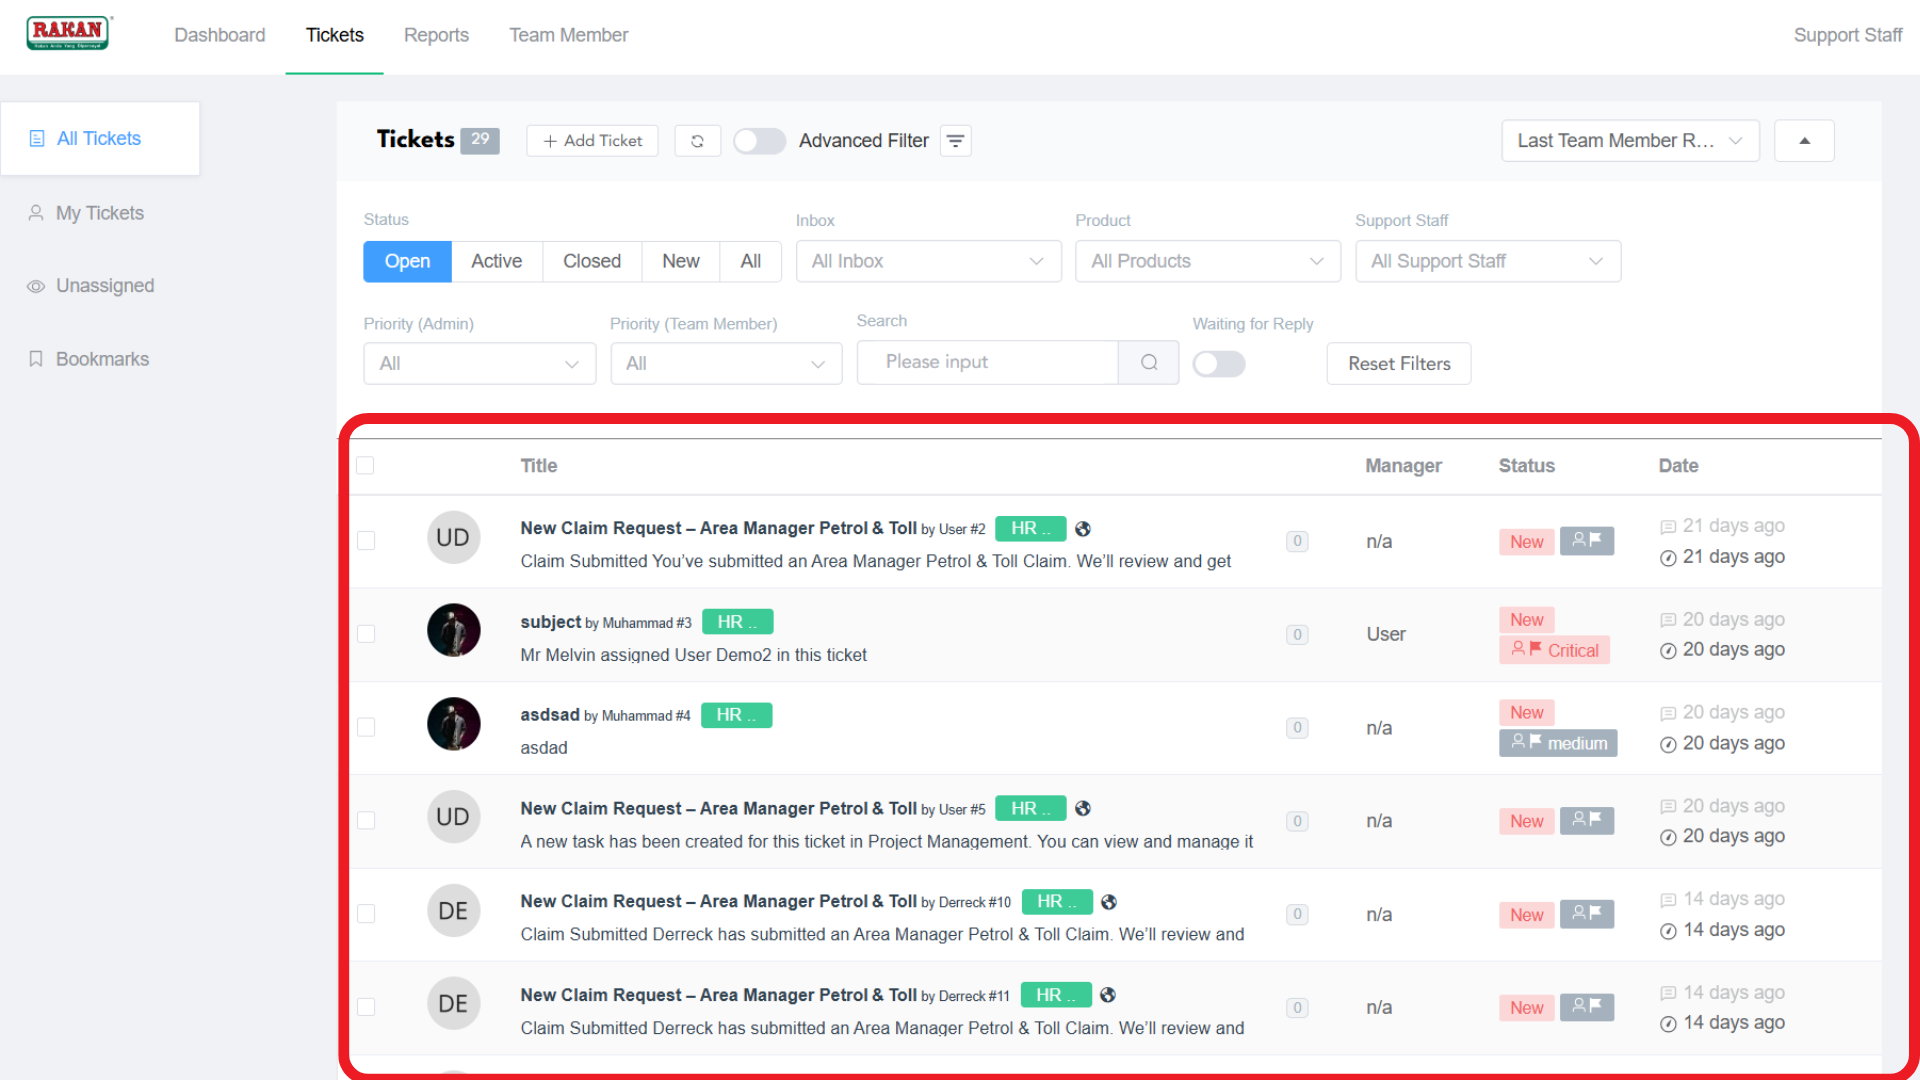
The tickets list displays:
- Status Filters: Open, Active, Closed, New, All
- Advanced Filtering Options: Inbox, Product, Support Staff filters
- Priority Filters: Priority (Admin) and Priority (Team Member) dropdowns
- Search Function: Text search with “Waiting for Reply” toggle
- Sorting Options: Available through the dropdown (Last Team Member Response, Ticket ID, Product ID, Priority, etc.)
2.4 Individual Ticket Management
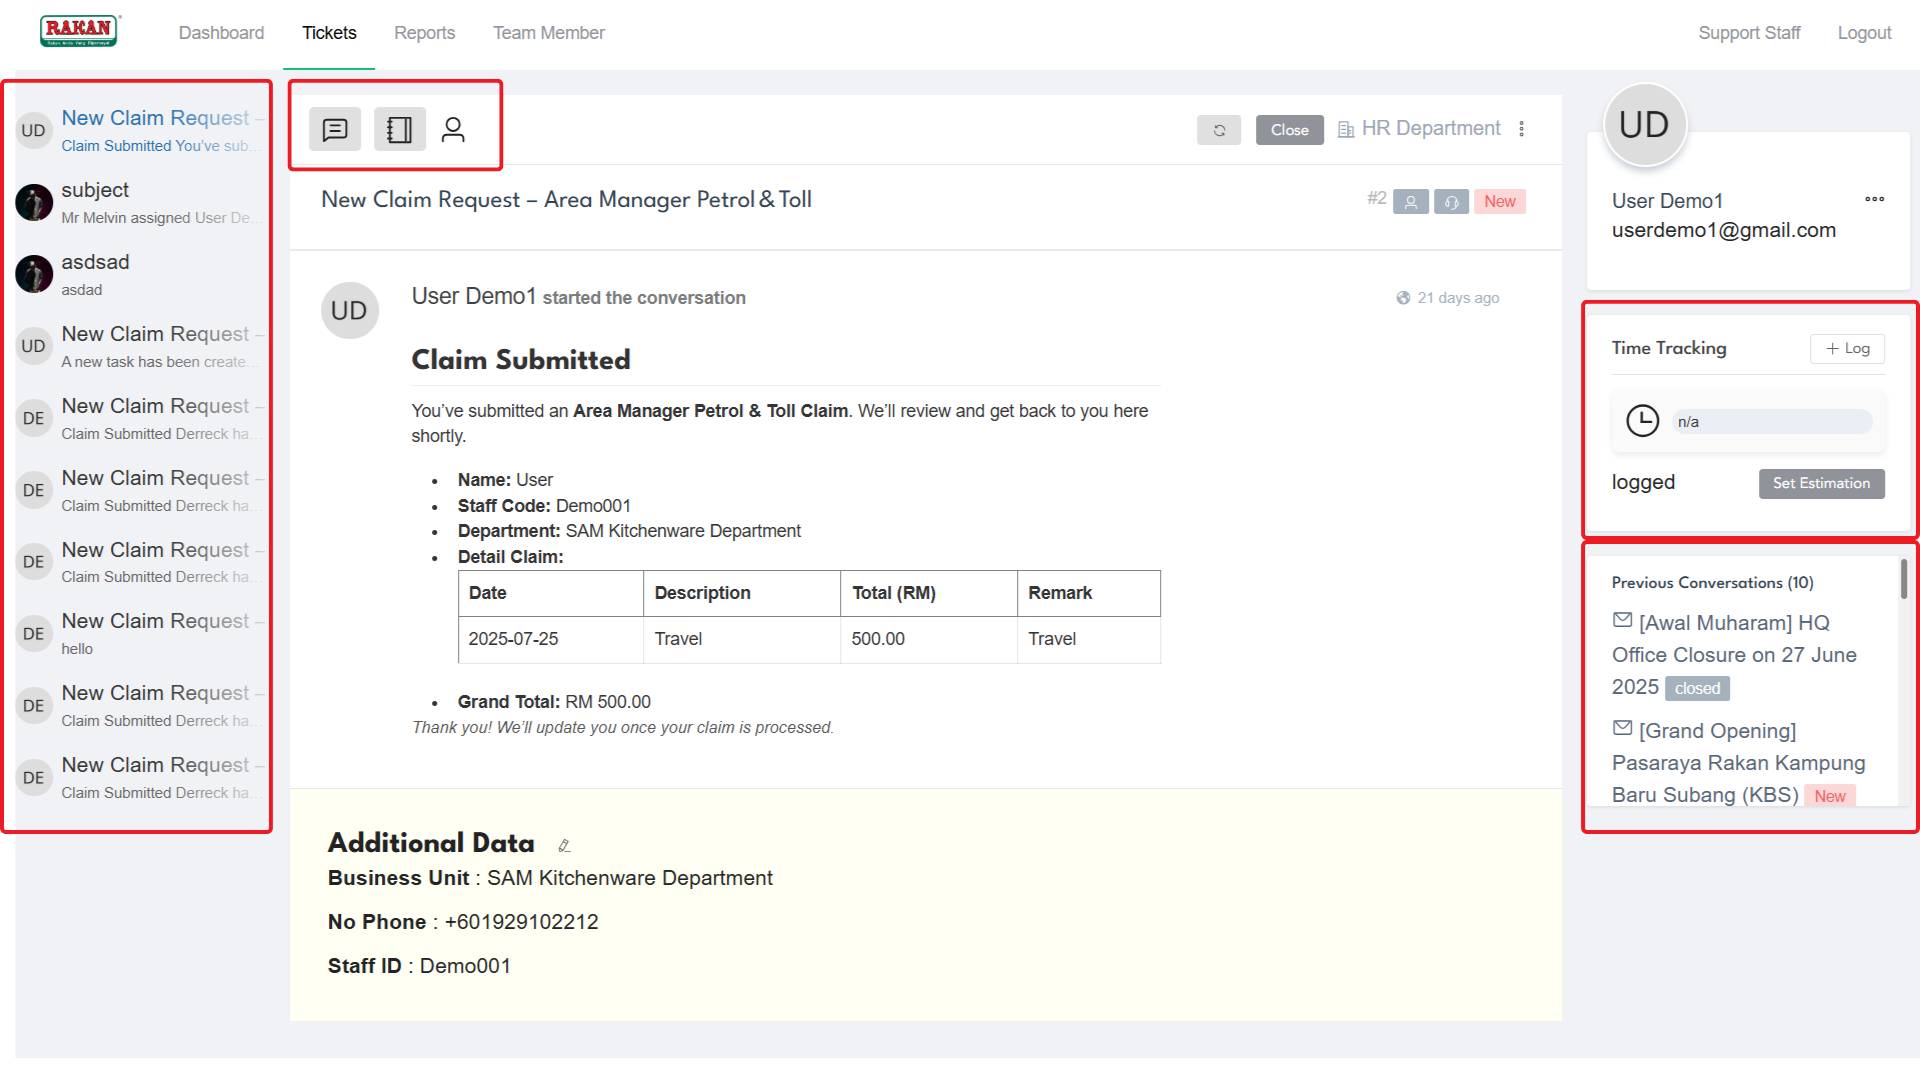
When opening a specific ticket, you’ll see:
- Ticket Actions Menu: Merge Tickets, Add Task to Project Management, Add Bookmark, Close Ticket Silently, Delete
- Time Tracking: Located in the right panel with Log and Set Estimation options
- Team Member Conversation: Shows the conversation thread with team member communications
- Agent Responses: Support staff responses and internal communications
3. How to Create a Manual Ticket at Backend
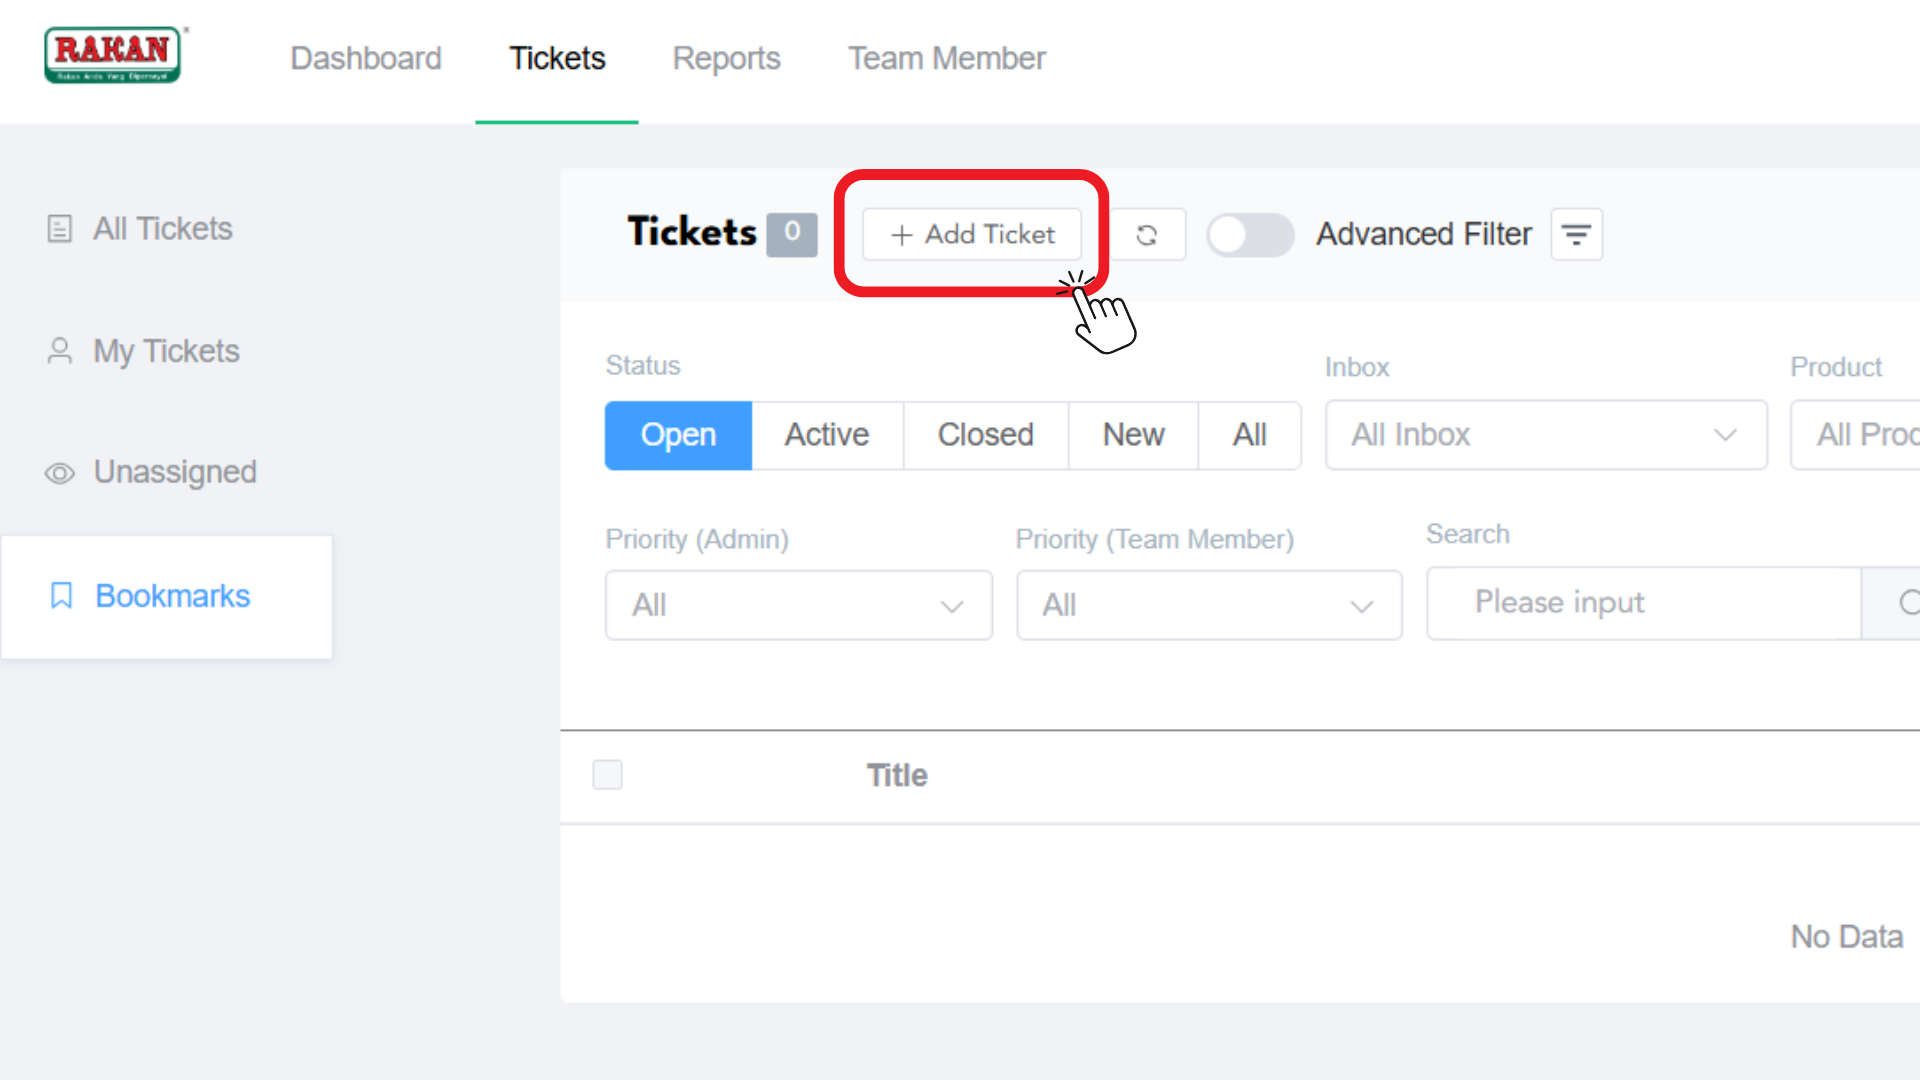
3.1 Initiating Ticket Creation
- Go to your Ticket Management Dashboard and click on Tickets.
- Click on the + Add Ticket button in the tickets interface.
- A modal window titled “Create a Ticket” will appear.
3.2 Team Member Selection and Setup
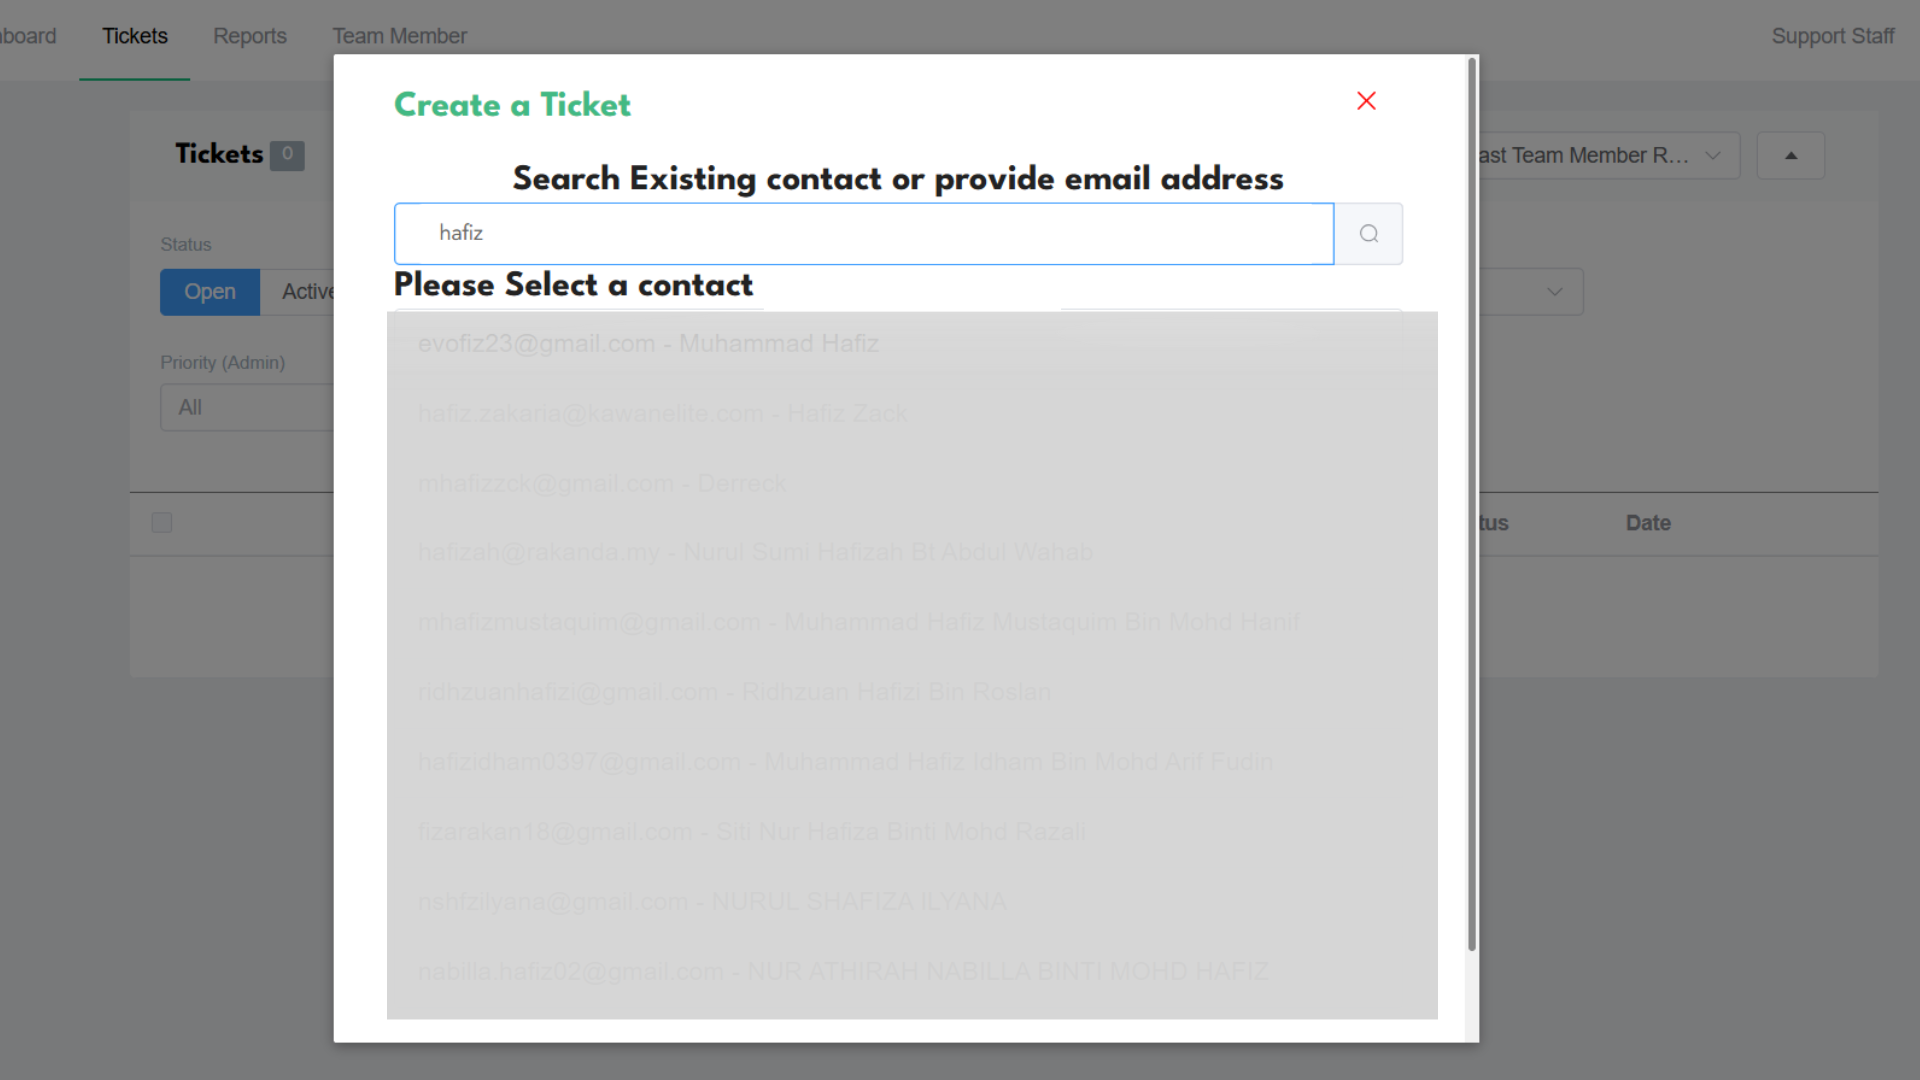
- Search Existing Team Members: In the “Search Existing contact or provide email address” field, type the team member’s name or email.
- Select from Results: The system will display matching contacts under “Please Select a contact”.
- Available Contacts: Choose from the dropdown list showing email addresses and names of existing team members.
3.3 Ticket Configuration
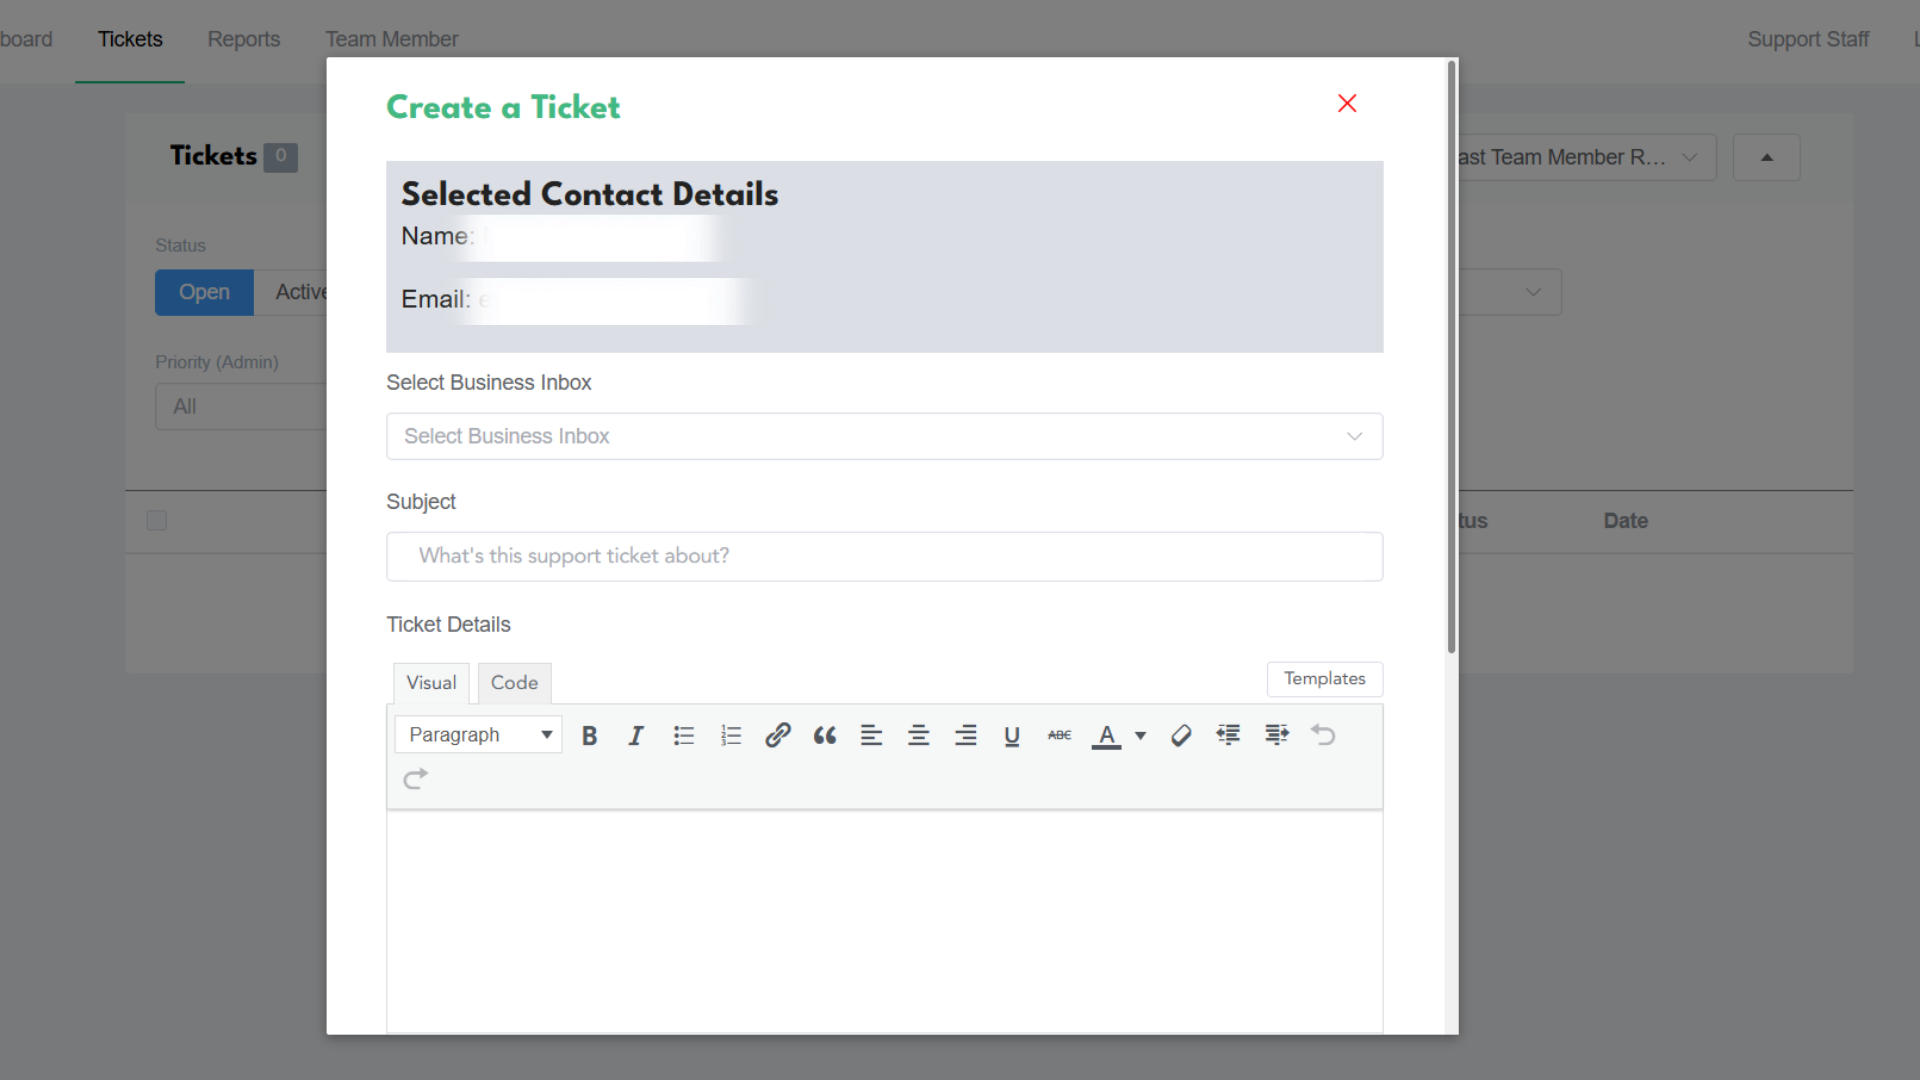
Basic Ticket Information
- Subject: Enter a clear, descriptive subject for the ticket.
- Message Content: Use the rich text editor to provide detailed description of the issue or request.
- Formatting Options: Utilize the text editor’s formatting tools (Bold, Italic, Lists, Links, etc.).
")
File Attachments
- Click to upload: Use this button to attach relevant files.
- Supported Types: Photos, CSV, PDF/Docs with maximum file size of 7.0MB.
Priority and Classification
- Priority (Team Member): Select from Normal, Medium, or Critical priority levels.
- Business Unit: Choose the appropriate business unit from the dropdown.
- No Phone: Optional phone number field.
- Staff ID: Enter relevant staff identification if applicable.
3.4 Creating the Ticket
- Review all entered information for accuracy.
- Click Create Ticket button to save and activate the ticket.
- The ticket will be immediately available in the system for processing.
4. How to Perform Agent Time Tracking
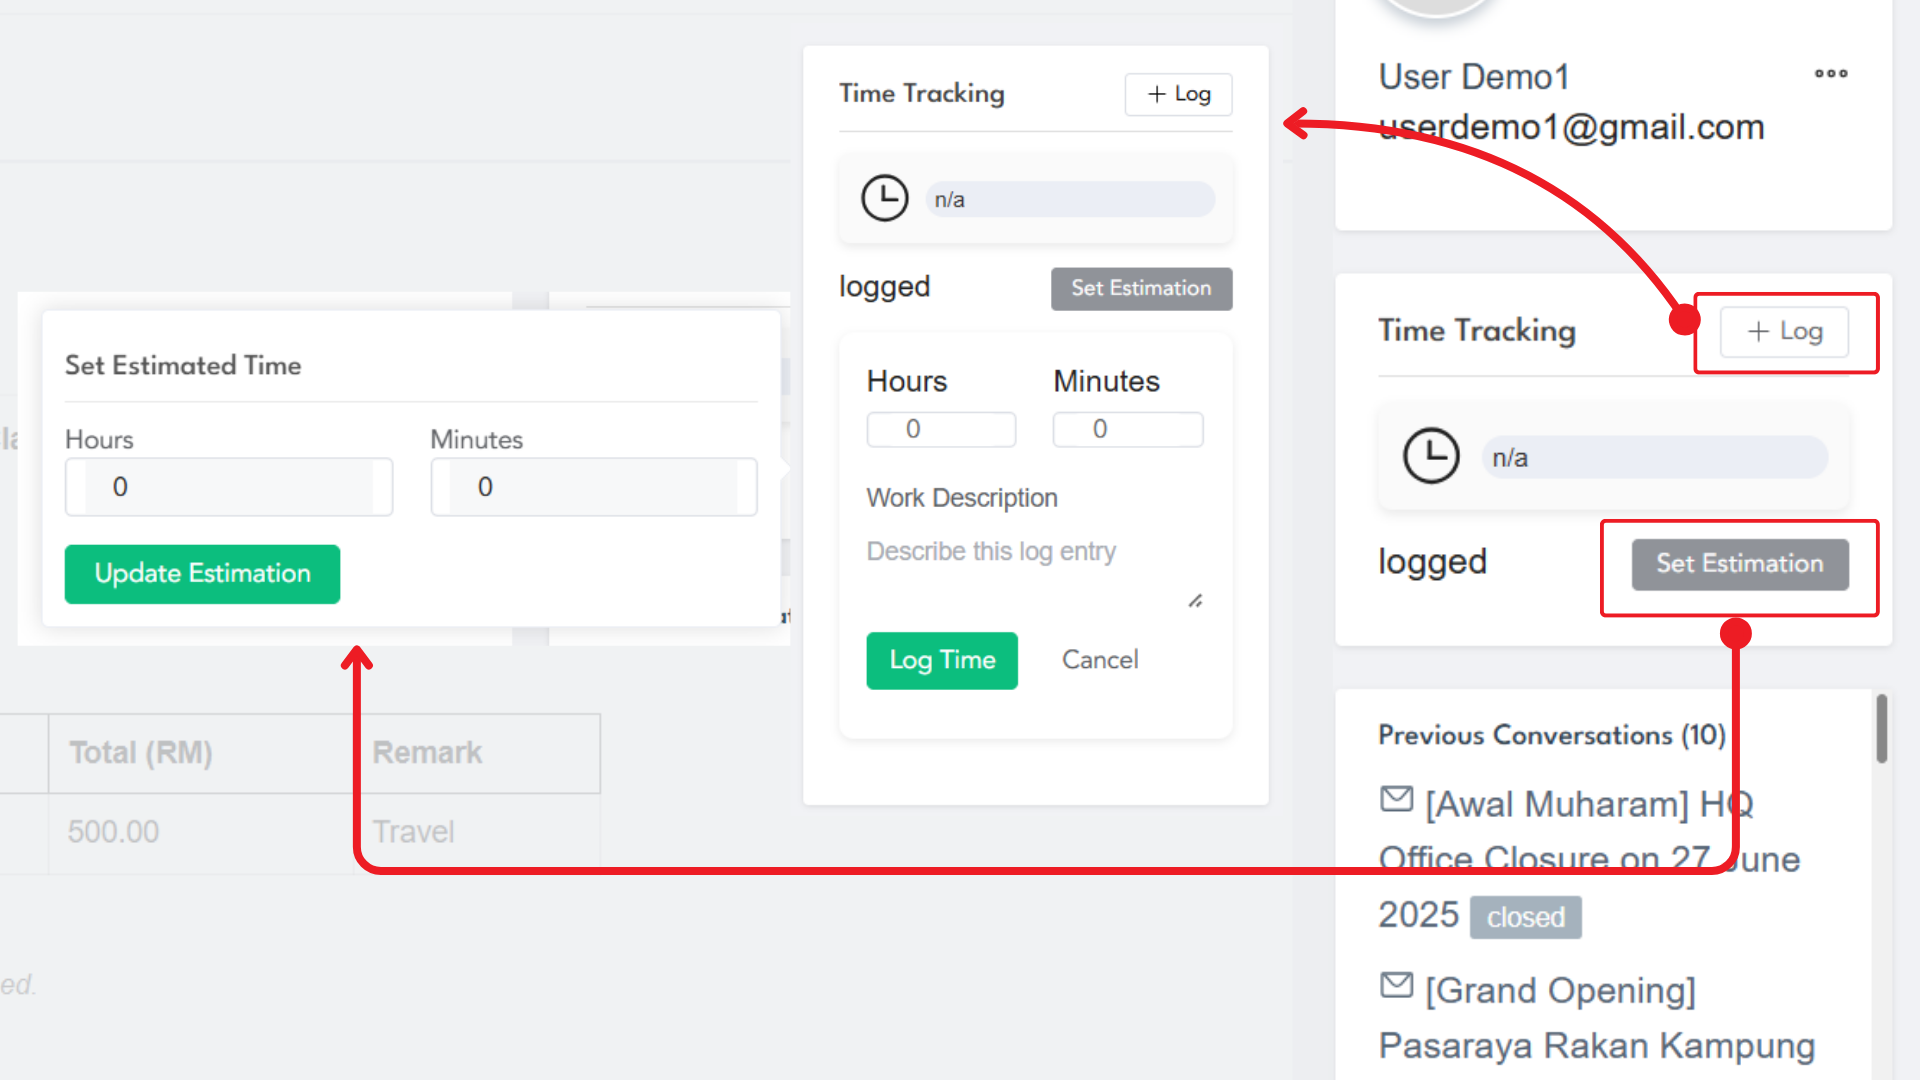
4.1 Accessing Time Tracking
- Navigate to the specific ticket where you want to track time.
- In the right panel, locate the Time Tracking section.
- You’ll see two main options: + Log button and Set Estimation link.
4.2 Setting Time Estimates
- Click Set Estimation to open the time estimation dialog.
- Set Estimated Time: Enter the expected time needed for ticket resolution.
- Hours: Input estimated hours in the hours field.
- Minutes: Input estimated minutes in the minutes field.
- Click Update Estimation to save the time estimate.
4.3 Logging Work Time
Time Log Entry
- Click the + Log button to open the time logging interface.
- Hours: Enter actual hours spent working on the ticket.
- Minutes: Enter actual minutes spent on the ticket.
- Work Description: Add details about the work performed in the description field.
- Placeholder Text: “Describe this log entry” guides you on what information to include.
Submitting Time Entry
- Click Log Time button to save the time entry.
- Click Cancel if you want to discard the entry.
- Time entries are immediately recorded and can be viewed in reports.
4.4 Time Tracking Benefits
- Progress Monitoring: Track actual time versus estimated time for efficiency analysis.
- Workload Management: Better understand time allocation across different tickets.
- Performance Reports: Generate detailed timesheet reports for productivity analysis.
- Billing Accuracy: Maintain accurate records for time-based billing or cost analysis.
5. How to Merge Tickets
5.1 Prerequisites for Merging
- Permission Requirements: Only those with permission can merge tickets.
- Irreversible Action: Once you merge all tickets, you can’t unmerge them.
- Same Team Member: Tickets must be from the same team member to be merged.
5.2 Merging Process
Accessing Merge Function
- Open the specific ticket you want to merge others into.
- In the ticket view, locate the three-dot menu icon (⋮) in the right panel.
- Click on Merge Tickets from the dropdown menu.
Selecting Tickets to Merge
- A dialog will display all tickets from the same team member.
- Ticket Information: Review ID, Title, and Status of each available ticket.
- Selection Process: Choose which tickets to merge into the main thread.
- Confirmation: Verify selections before proceeding with the merge.
5.3 Post-Merge Management
- Unified Response: You can now respond to all merged tickets with a single response.
- Complete History: All previous responses and conversations are preserved in the merged ticket.
- Streamlined Communication: Future interactions occur in the consolidated ticket thread.
6. How to Assign Support Agent
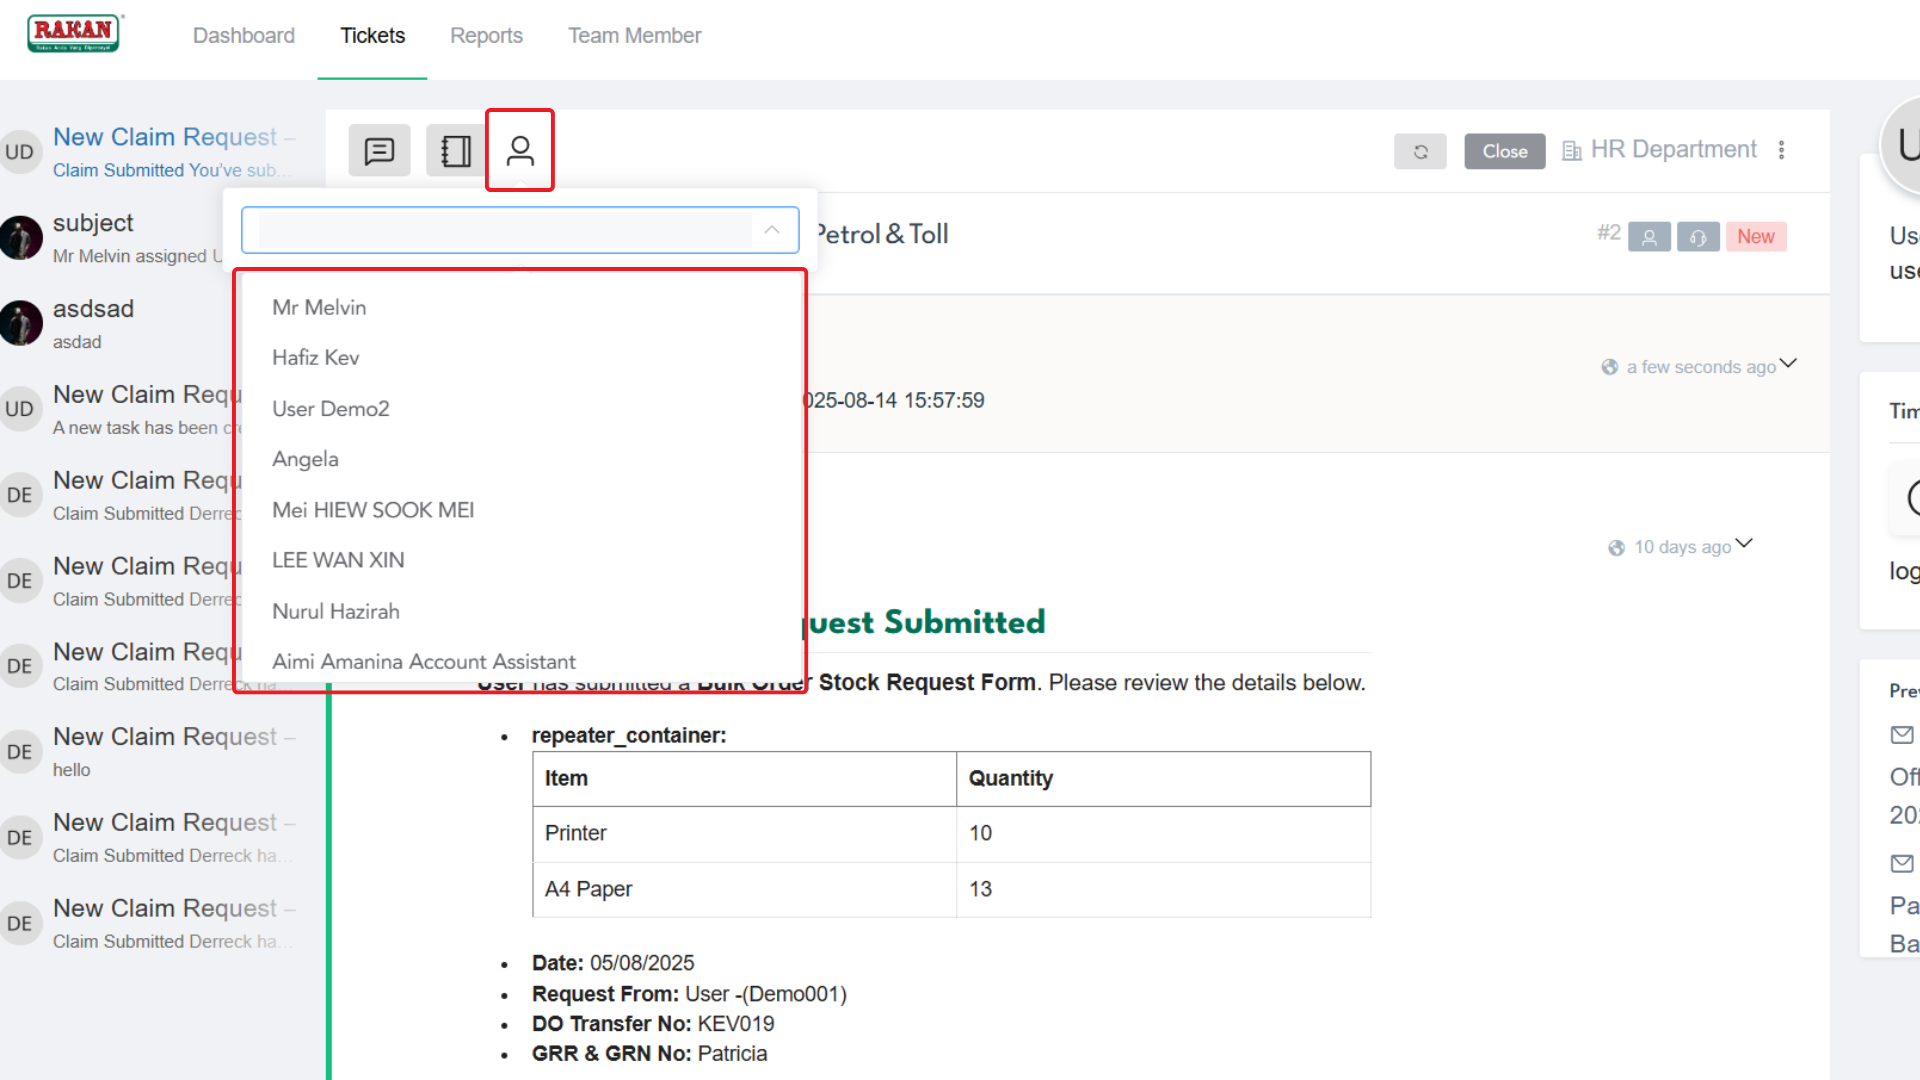
6.1 Individual Ticket Assignment
- Open the specific ticket that needs agent assignment.
- Click the 👤 (person icon) setting in the ticket interface.
- This allows you to change the agent assigned to this ticket at any moment.
- Select the appropriate agent from the dropdown list.
6.2 Assignment Best Practices
- Skill Matching: Assign tickets based on agent expertise and specialization.
- Workload Balance: Consider current agent workloads when making assignments.
- Response Time: Ensure assigned agents are available for timely responses.
6.3 Assignment Tracking
- Status Updates: Monitor assignment changes through ticket activity logs.
- Team Member Notification: System will notify team members of agent assignments when appropriate.
- Internal Communication: Use internal notes to communicate assignment reasons to other agents.
- Review Information: Verify all details before submission.
- Submit Ticket: Click submit to create the ticket.
- Ticket ID: Note the assigned ticket ID for future reference.
- Status Monitoring: Track ticket progress through the staff portal.
7. Filtering, Sorting & Searching Tickets
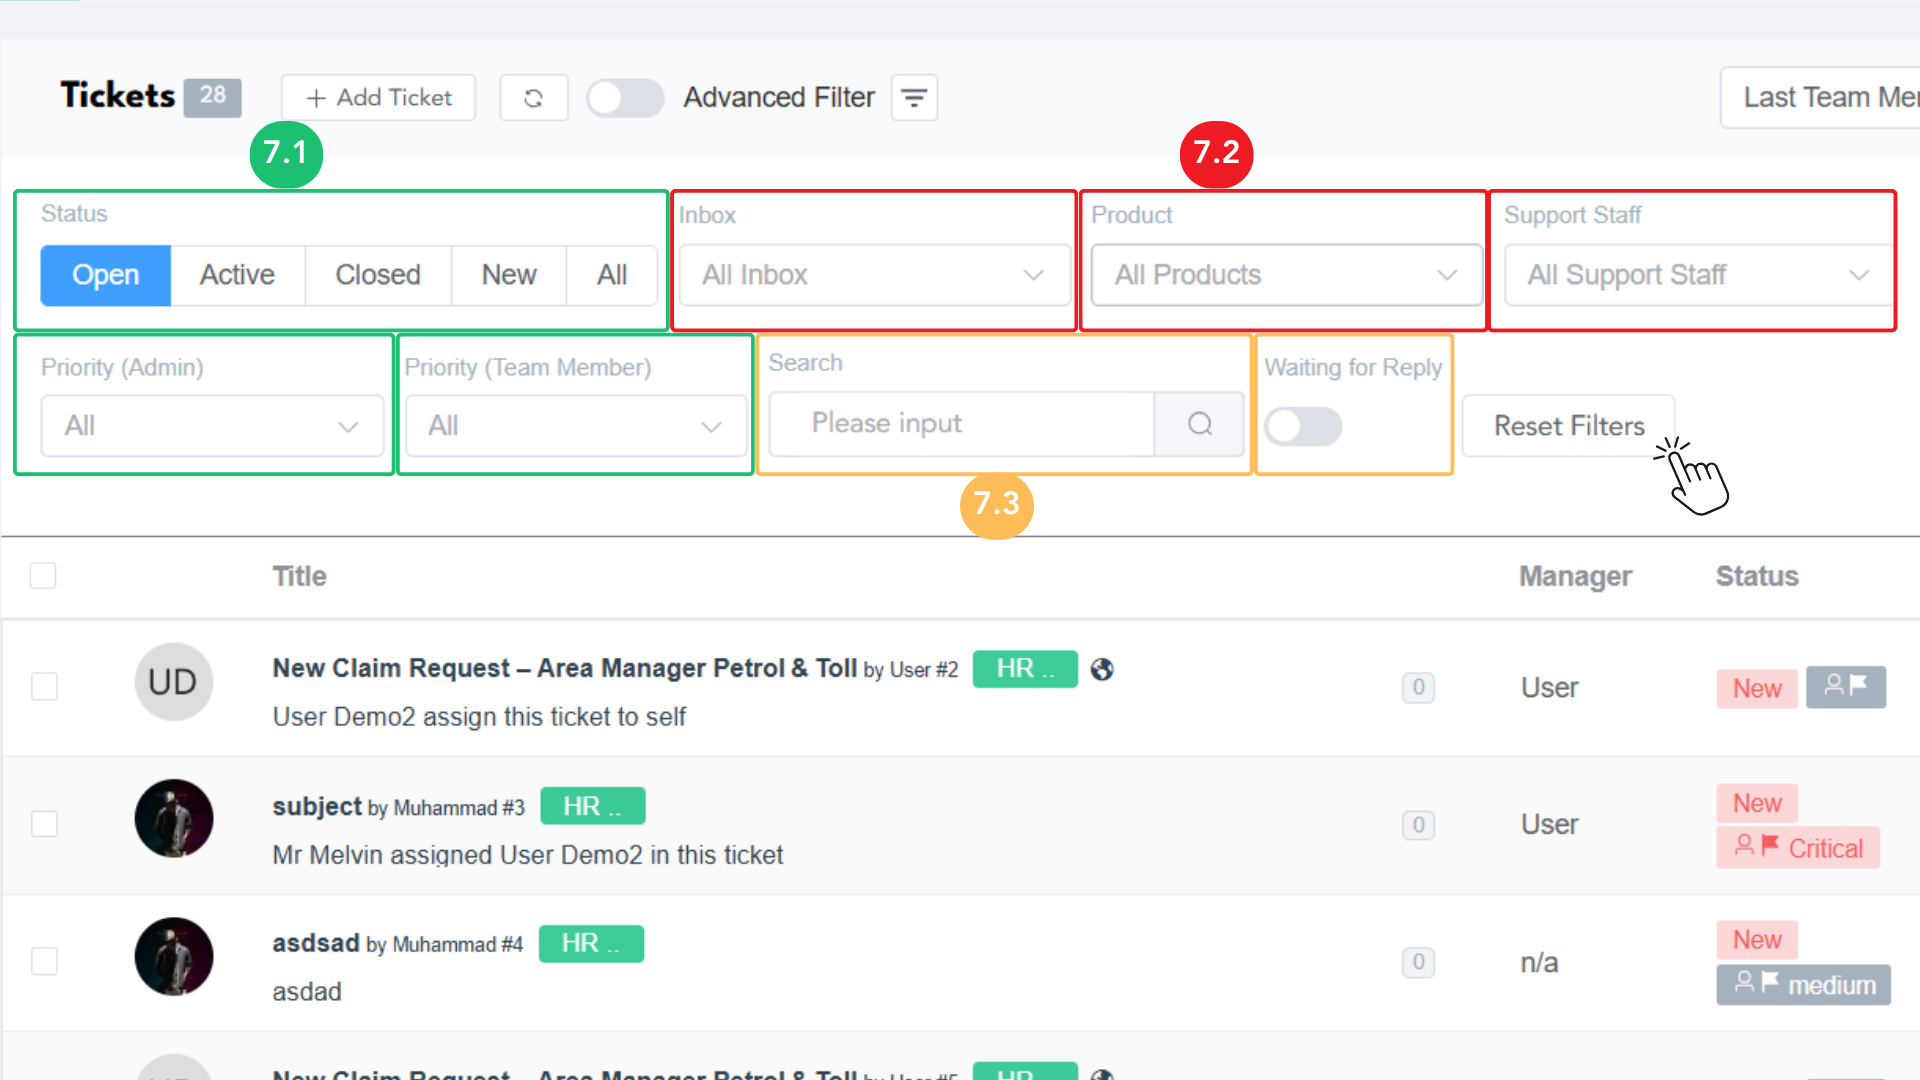
7.1 Basic Filtering Options
Ticket Status Filtering
- All: Display all tickets regardless of status.
- Open: Show tickets that are currently open.
- Active: Display tickets currently being processed.
- Closed: Show resolved and closed tickets.
- New: Display newly created tickets.
Priority Filtering
- Admin Priority: Filter by priority set by support agents (Normal, Medium, Critical).
- Client Priority: Filter by priority set by team members (Normal, Medium, Critical).
7.2 Advanced Filtering
Filtering
- Product Filter: Filter tickets based on the type of products associated with tickets.
- Business Inbox Filter: Filter tickets based on your Business Inboxes if you have multiple business inboxes.
- Support Staff Filter: Filter tickets depending on the Support Agent – only those tickets assigned to a particular agent will appear..
7.3 Search Functionality
Basic Search
- Keyword Search: Search for tickets by typing relevant keywords in the search field.
- Waiting for Reply: Turn on this option to view tickets currently waiting for a reply.
Advanced Search Parameters
- ID Search: Search any tickets based on the Ticket ID.
- Team Member ID Search: Search for tickets using team member ID in the format: team_member_ID: 29.
- Reset Filters: Use the Reset Filters button to return filtering to the default state.
7.4 Sorting Options

Available Sorting Categories
- Ticket ID: Sort tickets by their unique ticket identification number.
- Product ID: Arrange tickets based on associated product identification.
- Priority: Sort by ticket priority level (Normal, Medium, Critical).
- Client Priority: Order by priority level set by team members.
- Title: Sort tickets alphabetically by ticket title.
- Last Agent Response: Sort by the most recent response from support agents.
- Last Team Member Response: Order by the most recent response from team members.
- Waiting Time: Sort by how long tickets have been waiting for response.
8. How to Merge Tickets to Project Management
8.1 Project Management Integration
Prerequisites
- Project Access: Ensure you have permissions to create tasks in the project management system.
- Active Projects: Verify that relevant projects exist for task assignment.
- Integration Setup: Confirm that project management integration is enabled in your system.
8.2 Converting Tickets to Project Tasks
Accessing Project Integration
- Open the specific ticket you want to convert to a project task.
- In the ticket actions menu (three-dot icon), select Add Task to Project Management.
- This will create a corresponding task in the project management system.
Task Creation Process
- Automatic Task Creation: The system automatically creates a project task based on the ticket information.
- Task Details: Ticket subject, description, and priority are transferred to the project task.
- Assignment Transfer: Current ticket assignee becomes the task assignee.
- Status Mapping: Ticket status is mapped to appropriate task status.
8.3 Project Management Features
Task Tracking
- Status Updates: Monitor task progress through project management interface.
- Milestone Integration: Tasks can be associated with project milestones.
- Time Integration: Time tracking data is maintained in both systems.
- Cross-Reference: Direct links between tickets and project tasks are maintained.
Collaboration Benefits
- Team Visibility: Project team members can view task progress.
- Resource Planning: Tasks integrate with project resource allocation.
- Progress Reporting: Project reports include ticket-derived tasks.
- Workflow Integration: Tasks follow established project workflows.
9. Key Points to Remember
- Ticket status must be updated when beginning or completing work to maintain accurate tracking.
- Internal notes are essential for communicating with other agents and documenting resolution steps.
- Time tracking accuracy improves workflow efficiency and generates meaningful performance reports.
- Prompt ticket assignment ensures team member inquiries receive timely attention from qualified agents.
- Related ticket merging avoids duplicate efforts and streamlines team member communication.
- Filtering and search features are crucial for efficiently managing large volumes of tickets.
- Professional communication must be maintained in all team member-facing responses.
- Resolution documentation in ticket notes helps with future reference and knowledge sharing.
- Priority monitoring ensures critical issues receive immediate attention and proper escalation.
- Regular status updates keep team members informed and demonstrate proactive service commitment.
- Project Management integration helps convert tickets to actionable project tasks when appropriate.
- Custom fields in ticket creation (Business Unit, Staff ID) help categorize and track tickets effectively.
By following this guide, support agents can efficiently manage tickets within the RAKAN Team Portal while maintaining high service standards and team member satisfaction.